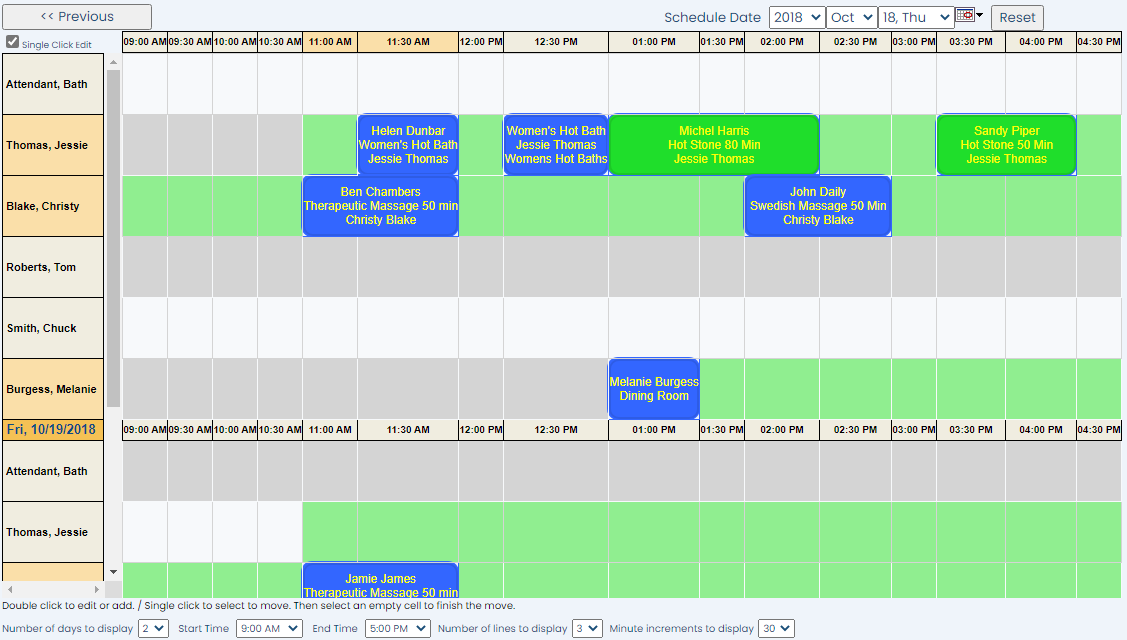
The Attendants Appointments screen is a visual representation of when your attendants (employees able to be assigned to performing specific activities) are scheduled with specific appointments, and is similar in appearance to the Activity Schedule screen, just with the Attendant name rather than the Facility name shown along the side. It shows the name of the guest and the activities scheduled, at the requested (appointment) time, in the row of the name of the attendant performing the activity. (Use the custom color options for Activities at your Property to ensure that the different activities entered into your Activity Schedule or Attendants Appointments screen are immediately recognizable at a glance. These are selected using the Activity Type section of the Schedule Types screen).
The list of Attendants available at your Property and the activities to which they can be assigned are configured as part of the Property and System Configuration area of Skyware Systems. This configuration may be done at any time if you have the appropriate access/authorization.
NOTE: Every attendant that you have available will have a row in the table on this Appointments screen, whether or not they have been scheduled for work on the displayed date. So that your Skyware Systems knows which attendants are available for scheduling during the time periods selected for any activity, you MUST configure the Attendants Schedule BEFORE scheduling any activities. This schedule will appear on the Attendants Appointments screen in green, ensuring that you do not schedule an attendant for an appointment when they are not available, and allows you to see what availability any attendants have left in their schedule.
When an appointment has already been entered into Skyware Systems will it be displayed here on the Attendants Appointments screen. You MAY add a new entry to the screen in an unoccupied time slot cell, or edit an entry that already exists, by clicking on the appropriate cell; however it is RECOMMENDED that you utilize the Activity Schedule screen to do so, as the Activity Screen that opens will only allow you to view the Activity Schedule screen, NOT return to the Attendants Appointments screen.
By default today's schedule will be displayed when opening the Attendants Appointment screen. You may however select different dates to display (including historical data to show what was scheduled on a previous date) using either the drop-down menus for date selection or by using the gray buttons Previous >> or Forward >> to navigate through the screen entries.
The Attendants Appointments screen is part of our Spas and Activities Module. If your Property does not currently have our Spa & Activities Module and you are interested in adding it, please contact us at Sales@SkywareSystems.com.
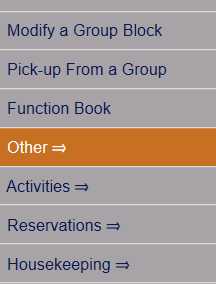
Depending on your Property's configuration, you may be able to access the Activities Menu directly from the Quick Menu.
Select Other from the Quick Menu on the left to be taken to the Other Front Desk Tasks Menu.
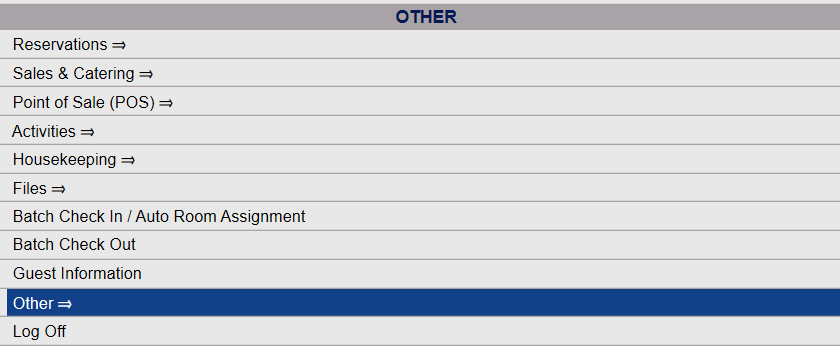
Or select Other => from the Other section (bottom right) of the Full Menu.
Click the icon on the left for the Full menu.
This will display the Full menu in a tabular form, with four sections, Registration, Status, Cashier and Other.
From the Other Section, select Other =>.
This will display the Other Front Desk Tasks Menu, which has four sections, Other List 1, Other List 2, Documents and Web.
Select Activities from the Other Front Desk Tasks menu, Other List 1 section.
This will open the Activities Menu, which has two sections, Items and Reports.
The Attendants Appointments command is in the Items section.
When selected, the Attendants Appointments screen will open.
You may view at a glance whom has been scheduled and when, on the specified Date. Any appointments entered into the schedule will be shown, with the colored bubble at the scheduled time containing the name of the guest associated with the appointment, and the activity requested.
By default the Attendant's Appointments screen show the current date. This may be altered using the Schedule Date drop-down menus or by clicking the Calendar icon to select the appropriate date.
You must use the gray button Reset to refresh the schedule.
You can also use the gray buttons Previous Day and Next Day to navigate manually through the schedule calendar.
Once you are viewing the Attendants Appointments screen for the date desired, you can see the details of your attendants names listed down the screen (on the left) and time slots across the top of the screen, with any scheduled appointment times blocked out. Using the cursor to hover over an entry in the schedule will show a pop-up of details associated with that entry, including any charges that are associated.
If you are CREATING an Activity, you will need to click on the time span block to create it, which will take you to the specific Activity Screen for that Activity Type in Skyware Systems, where you will add the details.
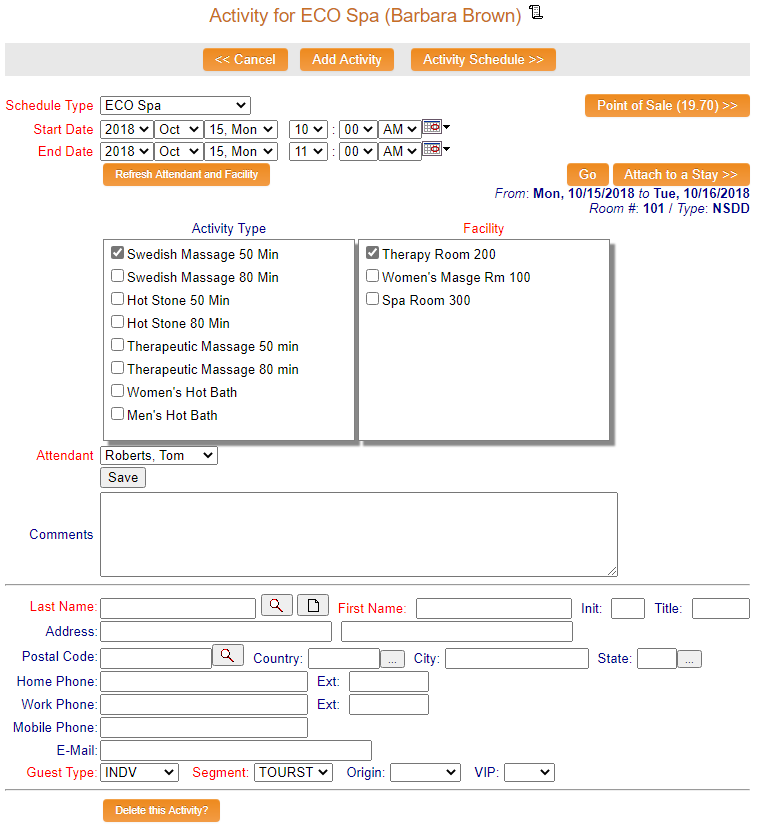
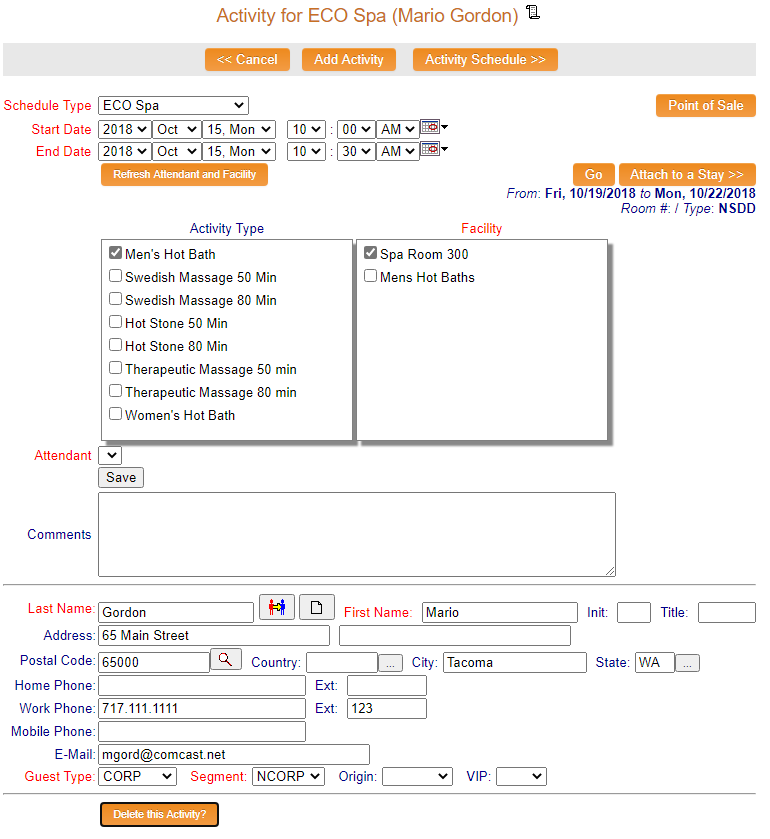
At the top of the screen you will see three orange buttons.
<< Cancel: If you have reached this screen in error, you can return to the Activity Schedule screen simply by clicking here.
Note: This button will NOT return you to the Attendants Appointments screen. To return to Attendants Appointments screen simply click the back button in the browser.
Add Activity: You can use this button to add the specified activity to the Activity Schedule WITHOUT then returning to the Activity Schedule. This adds the activity onto the schedule, but leaves you on this Activity screen, allowing you to add more activities for different guests without returning to the Activity Schedule in between.
Activity Schedule >>: This button will add the Activity shown and return you directly to the Activity Schedule.
Note: Using the Add Activity or Activity Schedule >> button automatically saves the details on this screen, so you WILL see an entry for the details currently shown on the Activity screen on the Activity Schedule when you next view it.
Schedule Type: By default this will show the Schedule Type that the Attendant is associated with, but it may be altered here. Use the drop-down menu to select a different type of activity to schedule, if necessary.
This field is required.
Use the Start Date and End Date drop down lists to identify the date AND time-period(s) for which you are scheduling the activity. Again, by default the screen will show the date and time selected from the Activity Schedule screen, but you may alter them here.
IF you alter the Schedule Type or listed Date/Time, you will need to click the orange button Refresh Attendant and Facility to refresh your selection options (below).
Activity Type: Select the Activity Type from those available in the section.
Note: Depending on the activity selected, the available attendants may change.
Facility: Select the Facility in which the Activity type will be performed. By default, the facility from the Activity Schedule selection used to open the Activity Screen will be selected, but you may change this.
Note: Only the facilities which have been configured as being available with the specific activity type will be shown for selection.
Attendant: This is a drop-down menu of the Attendants available to perform the chosen activity AT THE TIME selected. If the attendant is not available at the selected time, their name will not be listed in this field.
Note: BEFORE scheduling any activities can be completed, the attendant schedule (when your employees are working) must have been completed.
Click the gray button Save below the Attendant field to attach the selected Attendant to this scheduled activity.
Comments: If necessary, you may provide a description to accompany the scheduled activity for the guest in this section. For example, it is suggested that if the activity has already been paid for, it should be entered here that this has happened, and how much.
(Attaching a Stay to an Activity (see below) will AUTOMATICALLY associate the activity with the guest, and complete the Guest Information section for you).
You can create a new guest for this activity, or if the guest has stayed with you before, you can modify the fields for the guest you selected.
To create a new Guest, click the new Guest icon.
To search for and retrieve a name, postal code, accounts receivable number, travel agent name, or referral by name, click the search icon next to the information field and select a value to pre-populate values for the Guest. To browse for a State or Country, click the browse icon.
Fields with a name highlighted in red are required. Skyware Systems requires Last Name and Guest type only; your property will have chosen any others required.
Most fields in the guest information top section are self-explanatory, such as last name, first name or address fields.
Guest Type: This is a drop-down menu of available options. Choose one.
This field is used to determine (for marketing and reporting purposes) what "type" or "Market code" this guest would be categorized under.
NOTE: Guests can be automatically marked as tax exempt based on the guest type associated with the guest/stay record.
Segment: This is a drop-down menu of available options. Choose one.
This is a property-defined list that can be used for marketing and reporting purposes. Segment types and origins are used with Guest Types to further define your guests. Individual guest types lead to different segment types.
Origin: This is a drop-down menu of available options. You may choose one or leave this blank.
Origins are marketing codes that are located on both the group and individual level that can work together to define your guests and provide you with a meaningful marketing analysis for your property. These may include how a customer found the property, how they booked, or where the guests are coming from.
An Origin code refers to where the business came from (Advertising, Repeat Business, Sales Team, etc). Origin codes are very property specific.
VIP: This is a drop-down menu of available options. You may choose one or leave this blank. they are generally used with returning guests.
A guest can be marked as a VIP with the ability to select different types/levels of VIPs when entering a reservation.
These selections available are configured in the Property and System Configuration area of Skyware. See Property and System Configuration Overview for more details.
At this point you can click the orange button Activity Schedule, which will return you to the Activity schedule screen and now show an entry in your selected time slot. You DO NOT have to save, the Activity has been saved AUTOMATICALLY.
Note: If you have multiple guests to add to the Activity Schedule, instead you can use the orange button Add Activity. This adds the activity onto the schedule, but leaves you on this Activity screen, allowing you to add more activities for different guests without returning to the Activity Schedule in between. Once you have completed all the entries, you can then use the Activity Schedule button.
Once you have completed any changes you wish, you can click the orange button Activity Schedule, which will return you to the Activity schedule screen (NOT the Attendants Appointment screen) and now show the amended entry in your selected time slot.
Once you open the Attendants Appointment screen again you will see that the appointment details have been added.
Double clicking on the appointment entry displayed will open the specific screen for that Activity where you will amend any details.
If you alter the Schedule Type or listed Date/Time, you will need to click the orange button Refresh Attendant and Facility to refresh your selection options before further amending them.
Amend the Activity Type and Facility options selected as desired.
Once you have completed any changes you wish, you can click the orange button Activity Schedule, which will return you to the Activity schedule screen (NOT the Attendants Appointment screen) and now show the amended entry in your selected time slot.
Once you open the Attendants Appointment screen again you will see that the appointment details have changed.
Any Activity on the Attendant Appointment screen may be deleted using the Activity screen associated with it.
Double click on the Activity in the Activity Schedule to open the Activity screen for it.
At the bottom of the screen is an orange button Delete this Activity?. Clicking on this button will open a pop-up window from Skyware Systems to double check you wish to delete the activity.
To delete the activity you will need to also click the blue button OK.
Note: Doing so will IMMEDIATELY return you to the Activity Schedule screen (NOT the Attendants Appointment screen), which will show that the activity (and all associated details) you have just deleted has now been removed.
Once you open the Attendants Appointment screen again you will see that the appointment is not longer displayed here.
Note: If the Activity was deleted in error, it cannot be recovered. You will need to add in a new entry to replace it.
Note: The Activity Schedule screen is the recommended route for ADDING or EDITING your appointments. It is suggested that you use the Attendants Appointment screen for VIEWING appointments, and any availability left in an attendant's schedule, ONLY.
Any activity displayed on the Attendants Appointments interface may have one or more of a certain sub-set of Skyware icons associated with it, to give a quick and easy visual indication for your staff of specific information regarding the scheduled activity. If any of these icons are present, they appear within the activity reservation "bubble" (cell entry), next to the guest name. (See Activity Icons for more details).
1. In-House Icon: This icon (a house) will appear on the Activities Schedule for any activity appointments that are associated with a guest currently checked in at the property.
Note: This refers to checked in for a stay, not to the activity facility.
2. Electronic Signature Icon: This icon (an envelope with a pen and signature) will appear on the Activities Schedule for any activity appointments that have been confirmed electronically.
Note: This icon may be seen elsewhere within Skyware, also appearing next to any reservations that have been confirmed electronically when using the search functions, (such as the check-in or modify folio functions), if your system has been set up to allow this. Please be aware that Electronic Document Signing for Activities is enabled separately (and in a different way) to the Electronic Document Signing used with upcoming reservations for guests at your property.
3. Credit Card (on File) Icon: This icon (a credit card) will appear on the Activities Schedule for any activity appointments that have a credit card associated with them (on file).
Note: The credit card on file does NOT need to be the credit card used for payment.
4. Deposit Paid Icon: This icon (a dollar sign) will appear on the Activities Schedule for any activity appointments that have a paid deposit associated with them (on file).
Date Updated July 13, 2022